Since no one seemed to have done this before, I figured I'd write up my experience in changing out the rack and pinion. Looking back on it, it was a lot easier than I made it out to be, working in my driveway. Unfortunately, I didn't take pictures, so I will post edited pictures of my rack and shots from the FSM to help illustrate. Please note, I also installed new quick struts, so the struts were also taken out of the car freeing up more space - this is not in the FSM so it shouldn't be necessary for you.
1. First thing's first, jack your vehicle as high as you can and secure to get as much space to work underneath. I also place some cardboard and oil absorbing carpet for drips/spills Remove the front wheels.
2. Place a drip pan under the rack on the drivers side. Facing the front of the vehicle you will see 2 lines you need to disconnect, that are just below the steering column linkage. One has a hose clamp, the other is a nut. We're going to drain from these 2 lines to get most of the fluid out. You can also remove fluid from the reservoir to start as well to speed up the process from draining below, but I found this unnecessary since fluid flows downhill.

3. Turn ignition to ON so the steering moves freely. Turn the wheel all the way left and then right a few times to push the fluid through and out. I opted to grab the rotors/calipers at 9 and 3 o'clock positions and just rotated the wheel assembly from the outside. Benefits of this is you don't dirty your interior, and you have visual of the fluid coming out. Repeat turning until the majority of fluid slows to a drip.
4. Return your steering wheel to dead center and work on removing outer tie rods. Remove the cotter pin and nut from the bottom of the tie rods. Use a separator or strike the knuckle with a few good blows from a hammer (my method of choice)
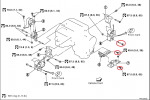
5. Remove the 2 mounting bolts from the rack and pinion. Get under the car and face the front of vehicle. there are 2 bolts that hold it in place, as well as one bolt that holds the bushing in place.You will not remove the bracket from the bushing, but you need to remove the nut to help with clearance when removing the rack.

6. Turn your rotors again until the lower mounting bolt on the lower joint is in a position facing the drivers side wheel well so you can remove it. Make sure you have a new bolt to replace this with.

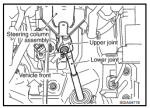
7 Now disconnect the steering linkage. Get into that awkward upside down position under the drivers dash and disconnect the 14mm universal bolt. The arrow points to it in the picture below. Take note of the direction of the notch out missing from the upper portion of this linkage. This will be important for re-installation.

8 Once these bolts are removed, you need to return your steering wheel to dead center again. This is very important for when you install the new rack and need to reinstall the lower joint to the upper joint. This keeps your steering wheel straight while your rack is centered. What I did was tie a brick around the bottom of the steering wheel and weight the wheel down from moving. With the upper bolt removed, now you can pry up the joint off the steering rack. Pry off and slide down the complete joint, out of the vehicle and out of the car.
9. Place a jack under the engine/transmission and support with a block of wood or several pieces of small plywood, until the point of first contact with minimal pressure.
10. From the drivers side, remove the Left Hand engine support insulator bolts, there are 2. Then remove the lower bolt and nut for the rear engine mount. Do not remove the bolt that goes through the bushing.

.
11. Jack the engine up as high as you can. You will be placing tension on the driveshaft so do not force how high the engine will go. It should move about 2-3 inches before stressing the bushing on the center of the driveshaft around the center of the vehicle. This is why the FSM wants you to disconnect the front exhaust (y pipe) and rear driveshaft to gain extra height which is not necessary.
12. Time to get that old rack out. Lift up on both sides so lift the rack out of its channel it sits in and you need to remove out the driver's side wheel well. You will need to twist and turn to get it out, and will likely bend the cylinder tube (slightly) that travels to the passenger side of the rack, due to it's height. That tube is the reason why the FSM wants to to remove the exhaust and driveshaft. If you cant muscle it out, just remove the bolt on the passenger side of that tube and give yourself that wiggle room.
13. Now match your new rack to your old one on a table. Remove the outer tie rods, counting how many spins it takes so you can install your new outer tie rods on the new rack with the same amount of turns. This keeps your wheels as close to where they were. You can Youtube this process as there are plenty of videos detailing this.
14. Remove that same tube we discussed in step 12 from the new rack, from both sides. You only need to disconnect the 1 tube

15. Slide your new rack in, and re-attach the tube.
16. Reverse the steps to complete the install. As long as you didn't touch your wheel at all, you can re-install the lower steering assembly with the notch facing the same direction into the channel, just don't attach the screw yet. Line up the lower portion to the top of steering rack and get it pressed down. Then you can tighten both bolts.
17. Fill the reservoir with Dexron VI fluid, turn the wheel all the way left and then right while checking fluid level. It took less than 2 quarts to fill. After you do some driving, you can empty the reservoir and refill again to get some more of the old fluid from the power steering pump out. You'll have to repeat a few times so buy a gallon worth of fluid.
17. Chug some beer and go get an alignment. Or DIY it if you're running of the highs of getting this job done!
1. First thing's first, jack your vehicle as high as you can and secure to get as much space to work underneath. I also place some cardboard and oil absorbing carpet for drips/spills Remove the front wheels.
2. Place a drip pan under the rack on the drivers side. Facing the front of the vehicle you will see 2 lines you need to disconnect, that are just below the steering column linkage. One has a hose clamp, the other is a nut. We're going to drain from these 2 lines to get most of the fluid out. You can also remove fluid from the reservoir to start as well to speed up the process from draining below, but I found this unnecessary since fluid flows downhill.
3. Turn ignition to ON so the steering moves freely. Turn the wheel all the way left and then right a few times to push the fluid through and out. I opted to grab the rotors/calipers at 9 and 3 o'clock positions and just rotated the wheel assembly from the outside. Benefits of this is you don't dirty your interior, and you have visual of the fluid coming out. Repeat turning until the majority of fluid slows to a drip.
4. Return your steering wheel to dead center and work on removing outer tie rods. Remove the cotter pin and nut from the bottom of the tie rods. Use a separator or strike the knuckle with a few good blows from a hammer (my method of choice)
5. Remove the 2 mounting bolts from the rack and pinion. Get under the car and face the front of vehicle. there are 2 bolts that hold it in place, as well as one bolt that holds the bushing in place.You will not remove the bracket from the bushing, but you need to remove the nut to help with clearance when removing the rack.
6. Turn your rotors again until the lower mounting bolt on the lower joint is in a position facing the drivers side wheel well so you can remove it. Make sure you have a new bolt to replace this with.
7 Now disconnect the steering linkage. Get into that awkward upside down position under the drivers dash and disconnect the 14mm universal bolt. The arrow points to it in the picture below. Take note of the direction of the notch out missing from the upper portion of this linkage. This will be important for re-installation.
8 Once these bolts are removed, you need to return your steering wheel to dead center again. This is very important for when you install the new rack and need to reinstall the lower joint to the upper joint. This keeps your steering wheel straight while your rack is centered. What I did was tie a brick around the bottom of the steering wheel and weight the wheel down from moving. With the upper bolt removed, now you can pry up the joint off the steering rack. Pry off and slide down the complete joint, out of the vehicle and out of the car.
9. Place a jack under the engine/transmission and support with a block of wood or several pieces of small plywood, until the point of first contact with minimal pressure.
10. From the drivers side, remove the Left Hand engine support insulator bolts, there are 2. Then remove the lower bolt and nut for the rear engine mount. Do not remove the bolt that goes through the bushing.
11. Jack the engine up as high as you can. You will be placing tension on the driveshaft so do not force how high the engine will go. It should move about 2-3 inches before stressing the bushing on the center of the driveshaft around the center of the vehicle. This is why the FSM wants you to disconnect the front exhaust (y pipe) and rear driveshaft to gain extra height which is not necessary.
12. Time to get that old rack out. Lift up on both sides so lift the rack out of its channel it sits in and you need to remove out the driver's side wheel well. You will need to twist and turn to get it out, and will likely bend the cylinder tube (slightly) that travels to the passenger side of the rack, due to it's height. That tube is the reason why the FSM wants to to remove the exhaust and driveshaft. If you cant muscle it out, just remove the bolt on the passenger side of that tube and give yourself that wiggle room.
13. Now match your new rack to your old one on a table. Remove the outer tie rods, counting how many spins it takes so you can install your new outer tie rods on the new rack with the same amount of turns. This keeps your wheels as close to where they were. You can Youtube this process as there are plenty of videos detailing this.
14. Remove that same tube we discussed in step 12 from the new rack, from both sides. You only need to disconnect the 1 tube
15. Slide your new rack in, and re-attach the tube.
16. Reverse the steps to complete the install. As long as you didn't touch your wheel at all, you can re-install the lower steering assembly with the notch facing the same direction into the channel, just don't attach the screw yet. Line up the lower portion to the top of steering rack and get it pressed down. Then you can tighten both bolts.
17. Fill the reservoir with Dexron VI fluid, turn the wheel all the way left and then right while checking fluid level. It took less than 2 quarts to fill. After you do some driving, you can empty the reservoir and refill again to get some more of the old fluid from the power steering pump out. You'll have to repeat a few times so buy a gallon worth of fluid.
17. Chug some beer and go get an alignment. Or DIY it if you're running of the highs of getting this job done!