

Greetings everybody:
So I'm writing up a new How To because pictures were lost when another forum member used an outside picture storage site for the pictures. I don't want these pictures to get lost so they're imbedded in the thread itself. Nothing sucks more than to read a fantastic thread to only see the picture missing. I think there is another series of pictures out there but they're not very easy to find. Since I did this a couple weeks ago with good results then I figured I would post my expriences.
So, to start...
I redid the High Pressure Power Steering (P/S) Hose on my 2004 Nissan Murano SL AWD; 133K miles. I noticed some dribbles on my garage floor and low power steering fluid. After getting it up on ramps I most definitely knew it was my High Pressure P/S Hose becuase the silver heat shielding mesh on the hose itself was completely saturated red-ish and drips coming off of the power steering retainer bolt. I also noticed quite a bit of mess on the other side as the hose was dripping onto my transfer case flange and flinging the fluid all over the place.
I consulted my local dealership and they wanted waaaaaaaay too much for the hose, fluids, copper washers, and o-ring. Around $275 if I went local. I went on Ebay and another dealership in California was selling the exact same Nissan OEM part numbers for a lot cheaper! They also included 2 bottles of their P/S fluid which you'll need due to what you'll loose during the rework.
IF you have an 04 AWD like me, you'll need the following parts for this job:
49720-CC10C -- High Pressure P/S Hose with Brackets
49345-6N200 -- P/S Sensor O-Ring
49726-Y0100 x2 -- Copper Washers
Nissan P/S Fluid x2
TOTAL COST: $113.98 including shipping :29:
I thought about going the cheaper way with AutoZone parts and fluids but I read complaints that the inner hose diameter was too small which caused whining in the pump. Plus they don't come with the brackets, rings, fluid, etc. It would have come out to about the same anyway so I went with OEM parts.
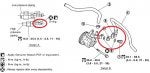
To start, there is a difference between the 2WD and AWD hoses. The AWD hoses have a bracket that bolts down to the back plate of the back/center motor mount (Pic A). Both the 2WD and AWD models are pretty much the same everywhere else. I also show the locations of the sensor o-ring and where the 2 copper washers go on the power steerig pump (Pic B). The 2 pictures also show all torque specs which are important to follow at all times!
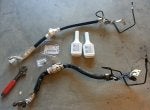
The first picture is of the actual hose itself (Pic 1). Here is the proof of what you'll get if you find the kit on EBay. You can see the center bracket, the nice curved area to the right that screws into the rack on teh drivers side, and the bulb on the left that bolts to the P/S pump itself.
In hind sight, I would probably use jack stands and remove the passenger side wheel and splash guard. I used ramps for this which probably restricted my access to the P/S pump (Pic 2). If I were to do it again, I'd go for the jack stands.
To start, you'll have to remove the wiper arms, wiper motor, plastic covers, etc to expose the back part of the engine compartment (Pic 3). If you want to know the step by step procedure to do this, reference my other thread, post 1 pictures 5-8:
http://www.nissanmurano.org/forums/...ms/68-maintenance/16785-how-throttle-body-spark-plugs-firewall-valve-cover.html
Next take a wrench and remove the bolt that retains the P/S hose. It's just behind the upper intake plenum. YOu can see where the wrench engages and the red arrow shows where the bolt is (Pic 4).
You'll then need to remove the "banjo bolt" (as people have been calling it online) and catch all of the P/S fluid that comes out of the hose and pump (Pic 5). You can also see the proof of where one of the leaks was coming from!
After all of the fluid has drained out, you'll move to the other side and unscrew the inlet fitting on the rack itself and the 2 retainer bolts on the back of the engine mount (Pic 6). More fluid will come pouring out of both the rack and the hose so be prepared to catch it. If you don't, you'll fill up your frame and it will make a mess.
Now that the hose is loose, pull it out from the passenger side. Be careful not to damage anything while pulling it out, maneuver the lines accordingly. There are a lot of small lines in this area you don't want to damage.
The next picture (Pic 7) shows the difference between the 2 P/S lines. They both seem to be shaped about the same. I didn't take the time to analyze them in detail as I started the project early afternoon on a Sunday. They were close enough so I moved on.
I wanted to show everybody the anatomy of the banjo bolt itself. It has a hole in the bottom and the sides (Pic 8).
Continued in next post...
So I'm writing up a new How To because pictures were lost when another forum member used an outside picture storage site for the pictures. I don't want these pictures to get lost so they're imbedded in the thread itself. Nothing sucks more than to read a fantastic thread to only see the picture missing. I think there is another series of pictures out there but they're not very easy to find. Since I did this a couple weeks ago with good results then I figured I would post my expriences.
So, to start...
I redid the High Pressure Power Steering (P/S) Hose on my 2004 Nissan Murano SL AWD; 133K miles. I noticed some dribbles on my garage floor and low power steering fluid. After getting it up on ramps I most definitely knew it was my High Pressure P/S Hose becuase the silver heat shielding mesh on the hose itself was completely saturated red-ish and drips coming off of the power steering retainer bolt. I also noticed quite a bit of mess on the other side as the hose was dripping onto my transfer case flange and flinging the fluid all over the place.
I consulted my local dealership and they wanted waaaaaaaay too much for the hose, fluids, copper washers, and o-ring. Around $275 if I went local. I went on Ebay and another dealership in California was selling the exact same Nissan OEM part numbers for a lot cheaper! They also included 2 bottles of their P/S fluid which you'll need due to what you'll loose during the rework.
IF you have an 04 AWD like me, you'll need the following parts for this job:
49720-CC10C -- High Pressure P/S Hose with Brackets
49345-6N200 -- P/S Sensor O-Ring
49726-Y0100 x2 -- Copper Washers
Nissan P/S Fluid x2
TOTAL COST: $113.98 including shipping :29:
I thought about going the cheaper way with AutoZone parts and fluids but I read complaints that the inner hose diameter was too small which caused whining in the pump. Plus they don't come with the brackets, rings, fluid, etc. It would have come out to about the same anyway so I went with OEM parts.
To start, there is a difference between the 2WD and AWD hoses. The AWD hoses have a bracket that bolts down to the back plate of the back/center motor mount (Pic A). Both the 2WD and AWD models are pretty much the same everywhere else. I also show the locations of the sensor o-ring and where the 2 copper washers go on the power steerig pump (Pic B). The 2 pictures also show all torque specs which are important to follow at all times!
The first picture is of the actual hose itself (Pic 1). Here is the proof of what you'll get if you find the kit on EBay. You can see the center bracket, the nice curved area to the right that screws into the rack on teh drivers side, and the bulb on the left that bolts to the P/S pump itself.
In hind sight, I would probably use jack stands and remove the passenger side wheel and splash guard. I used ramps for this which probably restricted my access to the P/S pump (Pic 2). If I were to do it again, I'd go for the jack stands.
To start, you'll have to remove the wiper arms, wiper motor, plastic covers, etc to expose the back part of the engine compartment (Pic 3). If you want to know the step by step procedure to do this, reference my other thread, post 1 pictures 5-8:
http://www.nissanmurano.org/forums/...ms/68-maintenance/16785-how-throttle-body-spark-plugs-firewall-valve-cover.html
Next take a wrench and remove the bolt that retains the P/S hose. It's just behind the upper intake plenum. YOu can see where the wrench engages and the red arrow shows where the bolt is (Pic 4).
You'll then need to remove the "banjo bolt" (as people have been calling it online) and catch all of the P/S fluid that comes out of the hose and pump (Pic 5). You can also see the proof of where one of the leaks was coming from!
After all of the fluid has drained out, you'll move to the other side and unscrew the inlet fitting on the rack itself and the 2 retainer bolts on the back of the engine mount (Pic 6). More fluid will come pouring out of both the rack and the hose so be prepared to catch it. If you don't, you'll fill up your frame and it will make a mess.
Now that the hose is loose, pull it out from the passenger side. Be careful not to damage anything while pulling it out, maneuver the lines accordingly. There are a lot of small lines in this area you don't want to damage.
The next picture (Pic 7) shows the difference between the 2 P/S lines. They both seem to be shaped about the same. I didn't take the time to analyze them in detail as I started the project early afternoon on a Sunday. They were close enough so I moved on.
I wanted to show everybody the anatomy of the banjo bolt itself. It has a hole in the bottom and the sides (Pic 8).
Continued in next post...


")


