Hello all,
I just got my new android head unit that I purchased from Ali Express, I install it and my initial impression are wow!!!! So much better than the stock head unit. The sound clarity and level is like day and night when compared to the stock head unit. It brought out loud bass and clear highs that I could not hear with the stock head unit.
Installation was straight forward, just plug in 2 cables on the back of the unit start the car, they provided all the cables that you need.
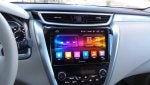
The unit is well made, I am impressed with the quality, nice screen, high resolution, crisp images and fonts.
I tried using the stock GPS cable, but when I plugged it in, I could not get a good GPS signal, so I plugged in the GPS receiver they provided.
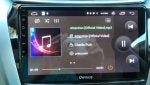
I used the bluetooth, both audio and phone and quality was very good.
The radio was able to tune in into stations that the stock radio would miss and quality was way superior
2 issues I have encountered so far:
1- The steering wheel control do not work, not sure why. I contacted the seller and waiting on a response.
2- My engine light came on after I install the unit, and I do not know how to reset it or turn it off.
I just did a quick and dirty test, I will run more test this weekend and post a more detailed review. I am heading to NJ tomorrow, so I will be able to test the GPS navigation.
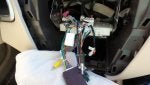
I could not find instructions on how to remove the head hunit on the 2015 nissan murano online, so I decided to figure it out myself. It wasn't hard, just need to be patient, I lost 3 screws, they all fell in the compartment below.
I can post detailed instructions on how to remove the head unit if you guys are interested.
I am going to install a backup camera next ( I have an eye on the Boyo 375HD).
http://www.aliexpress.com/item/Quad...d-Core-10-2-inch-1024-600-2-din-Android-4-4-CAR-DVD-player-For/32548646527.html
Stay tune for more....
BTW: I was outside working on the car, when all of a sudden a thunderstorm hit, hails started falling down, it was like the car was being hit by rocks. I quickly drove back to my garage and look for any damage. Luckily, the car held very well, I could not see any damages to the body of the car, paint scratches or dents. I will do a more thorough inspection this weekend when I wash the car. Hopefully, my insurance Geico will cover it if I see any damages.
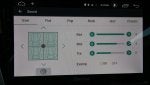
Here are some install pic... I took a video, but need to upload it to youtube later:
( I did not remove the plastic wrap on the screen )
![Image]()
![Image]()
![Image]()
![Image]()
You need this kind of screwdriver to remove the stock radio:
![Image]()
![Image]()
Engine light came on after I install the new unit:
![Image]()
![Image]()
![Image]()
I just got my new android head unit that I purchased from Ali Express, I install it and my initial impression are wow!!!! So much better than the stock head unit. The sound clarity and level is like day and night when compared to the stock head unit. It brought out loud bass and clear highs that I could not hear with the stock head unit.
Installation was straight forward, just plug in 2 cables on the back of the unit start the car, they provided all the cables that you need.
The unit is well made, I am impressed with the quality, nice screen, high resolution, crisp images and fonts.
I tried using the stock GPS cable, but when I plugged it in, I could not get a good GPS signal, so I plugged in the GPS receiver they provided.
I used the bluetooth, both audio and phone and quality was very good.
The radio was able to tune in into stations that the stock radio would miss and quality was way superior
2 issues I have encountered so far:
1- The steering wheel control do not work, not sure why. I contacted the seller and waiting on a response.
2- My engine light came on after I install the unit, and I do not know how to reset it or turn it off.
I just did a quick and dirty test, I will run more test this weekend and post a more detailed review. I am heading to NJ tomorrow, so I will be able to test the GPS navigation.
I could not find instructions on how to remove the head hunit on the 2015 nissan murano online, so I decided to figure it out myself. It wasn't hard, just need to be patient, I lost 3 screws, they all fell in the compartment below.
I can post detailed instructions on how to remove the head unit if you guys are interested.
I am going to install a backup camera next ( I have an eye on the Boyo 375HD).
http://www.aliexpress.com/item/Quad...d-Core-10-2-inch-1024-600-2-din-Android-4-4-CAR-DVD-player-For/32548646527.html
Stay tune for more....
BTW: I was outside working on the car, when all of a sudden a thunderstorm hit, hails started falling down, it was like the car was being hit by rocks. I quickly drove back to my garage and look for any damage. Luckily, the car held very well, I could not see any damages to the body of the car, paint scratches or dents. I will do a more thorough inspection this weekend when I wash the car. Hopefully, my insurance Geico will cover it if I see any damages.
Here are some install pic... I took a video, but need to upload it to youtube later:
( I did not remove the plastic wrap on the screen )


You need this kind of screwdriver to remove the stock radio:


Engine light came on after I install the new unit:


")