Nissan Murano Forum banner

Leather seat upgrade for my 2015 SV

12K views 31 replies 13 participants last post by  goombaypunch  
#1 ·
Hello all,

I do not like my cloth seat and would like to upgrade to leather seat. I bought some "PLU leather" seat cover awhile ago from AliExpress, the design is pretty nice, but it does not look OEM, and they started tearing apart just after 1 year.

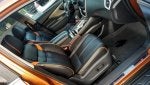
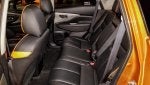
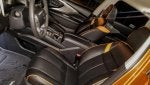
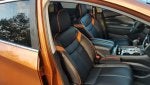
I do not like the cloth seat, and would like to upgrade to a leather seat OEM look. I did some research and came up with KATZKIN, never heard of them, but they seem to be good leather upgrade, and saw some good review. They will customize the leather to fit your car seat and ship it to an installer. Total price ( $800 for the leather seat + maybe $500 for a professional install). They will basically have to remove the existing cloth to install the KATZKIN.

I like their 2 tone design , and the matching color of the car for the second tone.

Does anyone have any experience with these? Or can give me any tips ?

This is the one I would like to get:

PDF brochure:
https://katzkinvrs.com/Res/vehicleImages/EBrochure_NissanMurano_2016.pdf

Thanks
 

Attachments

#3 ·
I had a 15 rouge and it had cloth seats in it. I wanted leather, the dealer said they would put in leather seats for me to seal the deal, NOW the story starts. I give them the car for about a week. who ever did them did not do a real good job on it. I really wasn't happy with them HOWEVER the problems started, The pass air bag lite wouldn't stay off. Kept coming on about every other day and it was a problem, SO they took the car back, fidled with it several days and called me to come to the dealer, they told me that NISSAN would not do anything about the car being the seats were not the ORIGINAL seats and they would have to figure it out on their own being It was a UN authorized install. I ended up with them taking the Rouge back, and yes I had to put some money with it but I upgraded to aa 15 Murano which I am not sorry I did it. Much nicer car. SO if you do make the change from the cloth seats to the leather Beware.. cover your bases and make sure that you don't get it stuck to you.
 
#5 ·
Thanks,
I was quoted $1500 for the leather and install. Will report back...
 
#8 ·
Yes Halwg,
That's a good idea, but I added lot of mods to my car, it will be hard to part away with it, and restart all over again.
The new nissan is the same anyway, no major changes, so it does not make sense for me to trade it in for a new one. I will wait until they come up with a new design.
The leather seat will add value to the car
 
#16 ·
The leather is probably an upgrade at resale, and if it looks stock, I can't see why it wouldn't be.

Most car mods, especially ignition, wheels, tires, or anything that gets into the electrical system may even lower the resale. There are plenty of us that don't trust an owner's upgrades and would rather have a stock vehicle when we buy it. If the previous owner has gotten into intake mods, K&N filters, etc. I'll pass on the car because it has probably been beaten hard. It depends on whether I'm buying from the owner and have a chance to evaluate why they did it.

When I see a car with an aftermarket radio, I assume the first thing I'll have to do is remove the radio and return the electronics to stock before I do anything else. Install shops have a habit of butchering wiring harnesses, and owners are worse.
 
#17 ·
Katzkin leather upgrade

Just received my Katzkin leather today straight from the manufacturer in California.


Will try to install them myself, never done this before, so should be interesting :).


Stay tuned....
 

Attachments

#18 ·
So today I got so exited to put my new leather seat, went to take out the seats and found these weird screws, which I have not seen before. I do not have any such bit in my toolbox, so I will make a trip to Lowes tomorrow and see if they have it.
I guess they do not want you to mess with the seats, that why they make it difficult to remove.
 

Attachments

#20 ·
I did not know this was going to be hard, had I known I would have just given the installer $800 to install it.

But was able to figure it out as I went along, there are lots of pieces, so far I just did the passenger seat, took me 8 hours. I plan to do the rest next week.

The hardest part was the air bag, the airbag sits inside a pouch that is attached to the leather seat.
The quality of the leather is pretty good, perforated with nice piping on the edges, and the orange wings.


I was told the wrinkles you see will go away over time, when it gets warmer and the leather stretches.


It is really amazing the engineering that goes into the car itself, I have been working on this car in and out, and I came to appreciate the level of engineering in designing every single aspect of the car. Every single piece is so meticulously place, there is no room for errors. That's why when I do some mods on my car, I make sure to do it right, the way the manufacturer would have done it.
 

Attachments

#22 ·
Hi KBrians,


Definitely should be faster when I tackle the driver's side.


Now I know the correct order to remove the upholstery, and how to remove the motor cover that is used for moving the seat back and forth, I did struggle a little bit with that in the beginning.


The bottom part comes off completely, ie it can be remove from the frame easily ( as you can see in the first picture), so this will make it easier remove the top upholstery once the bottom part is removed. It was by accident that I found out you can remove it from the frame, and by then I had already struggle to remove the top upholstery while it was still tied to the frame.


The air bag is another one I struggle with to get it in there. It goes inside a pouch that is attached to the leather cover. What makes it difficult is you have to insert the airbag inside the pouch first, then pull it inside the foam, then bolt it in, and then attach the hog clips. The trick is you have to insert the airbag before you try to put the leather on, then slide it through the hole and bolt it in.


The bottom part is easy, but the top part is very hard because it has lots of hog clips and it is a tight fit.


I think I made the wrinkle worst on the top part...
The trick here is to not stretch too much the leather as you slide it in. The leather itself conforms to the shape of the foam already, so no need to stretch it to fit.
 
  • Like
Reactions: KBrian
#24 ·
Katzkin leather upgrade completed

I finally completed the leather upgrade...


If you ask me I would do this again, the answer would be HELLLL NOOOOOO.


Sometimes I can be very adventurous, but this was a bad idea to tackle it myself.


The back seat are as hard as the front, if not harder, the foam do not come off the frame as I thought. Also being an SUV, they are heavy to lift. They are bolted down pretty hard, you will need a breaker bar to remove them.
At the end all my hands were sore, I wonder how these people assemble 1000s of these in production. Maybe they have a template they press down the seat to put he hog clips.


On the positive side, the experience was priceless, I learned a lot, how the seats are put together, and how the leather cover are installed.
And I really like the end results, it looks beautiful, the leather is very high quality, and feels really comfortable. They are easy to clean also, I just use a fiber cloth damped with water.


Here are some pictures, hope you like it...
 

Attachments

#26 ·
Hi Kbrian

More than I originally thought.

If you watch the katzkin install online, they make it seem so easy, but that is not so. I guess every car is different, and the murano is very hard.

I started with the passenger seat which took me 8hrs. The driver's seat is a little harder that the passenger seat, because it has more components. I started Friday night with the driver's seat, and finished everything Sunday evening. So, 2.5 days for the driver's seat and back seats.
 
#27 ·
You did a beautiful job, Assad. Your willingness to dive into major projects on a three year old car is admirable. I did the same thing 30 years ago with my first new car, an 88 5.0 Liter Mustang. Its still in my garage, but much of the originality is long gone
 
#29 ·
Thank you guys!!!


Although I did not know what I was getting myself into when I started this.

This is by far the biggest project I did on the car.
 
#30 ·
Hi assad. Just wondering how the leather has held up and if the wrinkles went away? Looks good anyway!
 
#31 ·
You be the judge!!!

Here is a picture I took today of the driver seat.

IMO, it held up pretty well so far. No fading or leather peeling off.
I only use water to clean it as the manufacturer recommended.

50548
 
#32 ·
I am impressed! I will try get this done once I get my audio setup they way I like. Taking your advice though going to have it professionally installed. Thanks for the update.