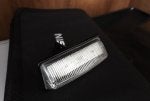
If anyone is interested, I upgraded my license plate lights to Philips leds. Looks nice and was relatively easy to do. I was bored so here's how to do it in excessive detail.
1. I used Philips 194's. Came in a 2 pack for $12.19 on Amazon.
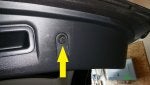
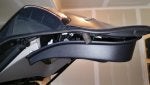
2. Remove the 4 clips across the bottom edge of the hatch trim panel. You can see these when the hatch is open and you look at the bottom edge where the plastic panel wraps underneath. These clips are the best. Just slip a small flat screwdriver in the small slot on the side and the center post will pull right out about 3/8". Once that post is sticking out, grab the post and pull the whole clip right out of the hole.
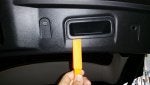
3. Still looking at the bottom edge, on the right side is the recessed pull down handle. This is held in place by ridges built into the handle itself along the long dimension of the handle. Pretty easy to pull out without any tools.
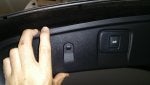
4. Don't try to remove the hatch activation switch. It's in the panel rather securely and you'll bugger up the panel for sure if you try to remove it. Just leave it in place.
5. Now the only thing holding the panel in place is a bunch of hidden friction clips throughout the panel.
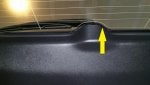
6. Start at the bottom corner and you should be able to pop off the clip near that corner and the one that's going up the side towards the top panel. Do the same thing on the other bottom corner.
7. Now, with a flashlight, you should be able to pull down the bottom edge and see inside the panel. From the corner nearest the activation switch, look inside and you'll see the switch housing. There is a green plug that goes into the back of the switch. The release tab is on the underside of the green plug towards the ground. Release that plug and then the switch will be free to come off with the panel.
8. Now by pulling on the bottom edge gently, the rest of the clips should easily release. Try not to angle the panel too much as that will increase the chances of deforming the clips.
9. I had 2 of my clips get messed up while doing this. I checked 3 Nissan dealers near me and none had them in stock. One ordered 4 for me and they came in the next day. I would recommend ordering a couple of these in advance so that you have the if you need them. They were about $3.50 each. Nissan part number 01553-0162U. "Clip-Trim".
10. Once the panel is off, you can see the bulb sockets from inside the hatch. No need to remove the outer strip over the plate that houses the lights. The bulb sockets simply do a quarter twist and then come right out. If the bulbs don't light, pull them out and reverse them. Neither of mine lit up until I flipped them around. When pulling the leds out of the socket be careful. When I did this, one of the frosted dome lenses on the led came off. I had to super glue it back on and then it was fine. Be sure to grab and pull by the base.
11. Once you know the lights are working fine, time to button things up. If you can get an extra set of hands for the next step it's helpful but not required. You'll need to hold the panel in position while you reconnect the plug for the activation switch. A little awkward.
12. Once that's done, try to get the panel in the correct position. You can see in from the side to get the corner and side clips aligned with their respective holes. Do each corner. Once those pop in, the rest fell right into place.
13. Lastly, replace the 4 post clips along the bottom edge. Make sure the posts are out while you insert the base back into the holes then just push the posts in. Re-install the pull down handle making sure you have it going the correct direction as it's angled a certain way for pulling downward.
14. That's it. Your done.
SAFETY NOTE: While working on the hatch, I had pulled it down to about eye level. When I put the bulbs in, I went around to the front and turned on my lights. I went back to see if they worked before putting everything back together and when I rounded the back corner of the car, the edge of the hatch caught me right in the middle of the forehead. Blood was dripping off my nose in seconds. Not fun. I dropped like PK Subban when somebody skates past him") . No stitches required but it took about 30 minutes to get it to stop leaking. Don't make the same stupid mistake I did.
. No stitches required but it took about 30 minutes to get it to stop leaking. Don't make the same stupid mistake I did.
1. I used Philips 194's. Came in a 2 pack for $12.19 on Amazon.
2. Remove the 4 clips across the bottom edge of the hatch trim panel. You can see these when the hatch is open and you look at the bottom edge where the plastic panel wraps underneath. These clips are the best. Just slip a small flat screwdriver in the small slot on the side and the center post will pull right out about 3/8". Once that post is sticking out, grab the post and pull the whole clip right out of the hole.
3. Still looking at the bottom edge, on the right side is the recessed pull down handle. This is held in place by ridges built into the handle itself along the long dimension of the handle. Pretty easy to pull out without any tools.
4. Don't try to remove the hatch activation switch. It's in the panel rather securely and you'll bugger up the panel for sure if you try to remove it. Just leave it in place.
5. Now the only thing holding the panel in place is a bunch of hidden friction clips throughout the panel.
6. Start at the bottom corner and you should be able to pop off the clip near that corner and the one that's going up the side towards the top panel. Do the same thing on the other bottom corner.
7. Now, with a flashlight, you should be able to pull down the bottom edge and see inside the panel. From the corner nearest the activation switch, look inside and you'll see the switch housing. There is a green plug that goes into the back of the switch. The release tab is on the underside of the green plug towards the ground. Release that plug and then the switch will be free to come off with the panel.
8. Now by pulling on the bottom edge gently, the rest of the clips should easily release. Try not to angle the panel too much as that will increase the chances of deforming the clips.
9. I had 2 of my clips get messed up while doing this. I checked 3 Nissan dealers near me and none had them in stock. One ordered 4 for me and they came in the next day. I would recommend ordering a couple of these in advance so that you have the if you need them. They were about $3.50 each. Nissan part number 01553-0162U. "Clip-Trim".
10. Once the panel is off, you can see the bulb sockets from inside the hatch. No need to remove the outer strip over the plate that houses the lights. The bulb sockets simply do a quarter twist and then come right out. If the bulbs don't light, pull them out and reverse them. Neither of mine lit up until I flipped them around. When pulling the leds out of the socket be careful. When I did this, one of the frosted dome lenses on the led came off. I had to super glue it back on and then it was fine. Be sure to grab and pull by the base.
11. Once you know the lights are working fine, time to button things up. If you can get an extra set of hands for the next step it's helpful but not required. You'll need to hold the panel in position while you reconnect the plug for the activation switch. A little awkward.
12. Once that's done, try to get the panel in the correct position. You can see in from the side to get the corner and side clips aligned with their respective holes. Do each corner. Once those pop in, the rest fell right into place.
13. Lastly, replace the 4 post clips along the bottom edge. Make sure the posts are out while you insert the base back into the holes then just push the posts in. Re-install the pull down handle making sure you have it going the correct direction as it's angled a certain way for pulling downward.
14. That's it. Your done.
SAFETY NOTE: While working on the hatch, I had pulled it down to about eye level. When I put the bulbs in, I went around to the front and turned on my lights. I went back to see if they worked before putting everything back together and when I rounded the back corner of the car, the edge of the hatch caught me right in the middle of the forehead. Blood was dripping off my nose in seconds. Not fun. I dropped like PK Subban when somebody skates past him
. No stitches required but it took about 30 minutes to get it to stop leaking. Don't make the same stupid mistake I did.