Nissan Murano Forum banner

Sound deadening installed on 2015 Nissan Murano

17K views 24 replies 12 participants last post by  PaulDay  
#1 ·
Hi all,

Since I replaced my stock speakers and added a subwoofer to my car, I started experiencing my doors rattling, especially when I listen to a song with a lot of bass. Sometimes I have to lower the volume for the rattling to go away.

The speakers I have installed in my car are high powered, 300 Watt RMS total and the subwoofer is 75 Watt RMS. The speakers produce lots of bass, which causes the door to rattle a lot.

I did some research and came with with sound mat that you installed in the car door to eliminate the rattling.

Metal enclosure, which is the car door in this case is not a good sound barrier, the sound wave the speakers produces travel through the metal, and gets spread around the car. You loose lots of bass and sound quality, as the sound is not confined within the car. This is why you never enclose speakers in a metal enclosure, hardwood is the best enclosure for speakers.

The way you can tell, turn on your speakers a loud volume, then from the outside of the car, put the palm your hand on the door, you can feel the door's vibration, this is not good.

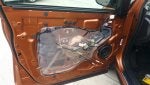
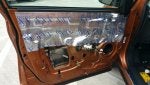
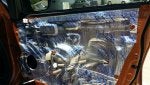
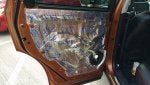
The murano does not have any sound barrier inside the door, it is all bare thin metal.

If you are an audiophile and and want to get the most out of the premium speakers you have in your car, you definitely need to install sound deadening, in this case a sound mat. The sound mat also helps with road noise, as the engine noise and the surrounding road noise is not transferred inside the car as you drive.

The one I bought is FatMat, from amazon; 50 sq ft was enough to cover all 4 doors in the murano, inside and outside the door.

The installation was not that hard, but it is time consuming; it took me 4 hrs to do the driver's side door, and 2 hrs for each of the remaining door (10 hrs total spread in 2 days). When you put the mat inside the door, you need to cut it in small pieces, that way it will be easy to fit in hard to reach places. Also the material is easy to work with and conforms to the contour of the door very easily. The sticky glue is very strong, so this is a permanent installation.

After the installation, no more rattling, all the doors rattling disappeared, and the bass is a lot louder. This also improved the sound quality when all doors are closed, the difference is amazing...

Anyway, here are some pictures I took during the installation

Also, in the video, you can see how the speakers move when I listen to a song with lots of bass. All these vibrations are now deadened by the sound mat instead of being transferred to the metal enclosure.


[ame]https://www.amazon.com/gp/product/B003TUNRGM/ref=oh_aui_detailpage_o05_s00?ie=UTF8&psc=1[/ame]

https://www.youtube.com/watch?v=CUKgF3iS7Ds
 

Attachments

#4 ·
Hello ASSAD. I am curious about doing this and it looks fairly easy. Any picture or word of advice in regard adding the sound dampening product inside the doors? Your picture number 4 shows that you did the inside. Also, have you notice a better sound response from the speakers? How about the overall noise when driving on the highway? Thanks. I would like to determine if it is worth doing this. Thanks.
 
#5 ·
@Luis DeJesus,

It made a big difference in sound, especially the bass, it also stopped the doors from rattling.
As far as road noise, I cannot tell for sure, but I am pretty sure it helps; the murano is a pretty quiet ride in itself.

The install is pretty easy, it is just time consuming (~10hrs for all 4 doors). I did the inside of the door to get better result, since the material was not that expensive, I had enough for all 4 doors inside an outside (50 sq ft). For inside of the door, I only covered the places I could reach with my hands, namely right behind the speakers, along the top and bottom of the door, it will be easier if you cut the mat in small pieces for the inside.

If you are going to do this, make sure you wear gloves, one side of the mat is aluminum and can cut your fingers if you are not careful. The material is also pretty sticky, the glue is pretty strong, so make sure you position it right the first time, or you will have a hard time trying to pull it out.

I will do my trunk this weekend, since I also noticed some rattling coming from there.
 
#7 ·
Hi @upinsmoke,

This is the one I bought from amazon (80mm), 50sq ft for $109, covered all 4 doors of the murano + inside the door. If you want to do the trunk, you will have to buy more.
[ame]https://www.amazon.com/gp/product/B003TUNRGM/ref=oh_aui_search_detailpage?ie=UTF8&psc=1[/ame]

I have never used Dynamat, so I cannot compare the two. I read through the reviews and I believe they are considered top of the line, but it is expensive. I went with the cheaper one FatMat, and I am glad I did. It works great for its purpose, and also easy to work with. It bends and cuts very easy, and also conform to the contour of the frame (as you can see in the pictures).

There is no contact point between the door skin and the window you have to worry about, as long as you stick the mat to the frame you will be fine. If you are doing inside the door, just cover as much as you can, because some places you will not be able to reach with your hands. Use the roller that comes with the Mat with back and forth motion to make sure it sticks well.

The work is not hard, but it is time consuming, and you will be rewarded at the end if you are an audiophile, as your music will sound much better, specially the bass; it will also totally eliminate the rattling coming from the door.

Here are the trunk pictures I promised to post but forgot.
The trunk door also rattles, especially if your sub woofer is located there. But the FatMat will stop the rattling, you can see it shakes to the sound of the bass, but it does not rattle.

If you are going to do the trunk, here are some things to consider:
- There are too many wires on the outside of the trunk door, so I only did the inside.
- This will make your trunk heavier, so if you have those automatic trunk lid that closes with a push of a button, this is something to consider. Make sure the lift can operate with the added weight of the mat. My trunk lid is manual, so I cannot tell...
 

Attachments

#8 ·
While researching the Murano before purchase (2017.5) I noticed a picture of the Murano (current gen) on the assembly line prior to the dash and interior mechanicals installation. The vehicle has a huge, thick, sound deadening mat (looks to be a cloth composite) that spans the front interior from the windscreen to behind the peddles, and from door to door. It was huge and impressive looking. Just a tidbit for those that might be wondering what's underneath the dash up-front.
 
#9 ·
Finally got around to starting work on my audio system. Sound deadened the doors and the difference in the road noise was amazing. Put a layer of Secondskin damplifier pro on and it worked wonders.

Taking the skin off and seeing what was inside the door (or lack there of ) was a real disappointment with Nissan. One crash bar low in the door rest of the door is pretty thin cheap steel. The doors have a real solid feel to them. The ringy tinny sound is completely gone. i95 traffic noise has been greatly decreased.

What I found is you don't have to go crazy with how much you put in or being super neat about it. Took about 4 hours for the first door just getting situation. Also installed Focal speakers in the doors so had to do some modifications to the adapter I got from crutchfied - just drilled a hole through the side of the adapter to feed the speaker connection adapter though. Other three doors took about 2 hours a piece for me.

If you are on the fence about doing install , don't worry - it's quite easy. Three screws that hold the interior skin in (10mm screws used throughout). Pop the panel off and your in business. Back doors are cake to do too. I used about 5 sheets each for the front and 4 each in the back. Cut the material into smaller pieces, you don't have to install in a contiguous piece. Nor do you have to get every square inch, just where you can reach. The secondskin material is very easy to cut, i used tin snips personally though. There is no odor whatsoever to this material also. I used larger sections on the inner (facing interior compartment) to cover the holes. Also reinstalled the factory vapor barrier on top of the material. I would also recommend getting one of the wood rollers to help installing. You definitely don't need a heat gun with this material. Also did not wear gloves and with 10 hours of dealing with the material not one cut from it.

Next step is getting an amp installed. Thinking about an Audison 8.9 bit.
 
#10 ·
Nice,

Should have taken some pictures, always nice to see new install
 
#13 ·
Noticed a few things since soundproofing the doors. The noise from other vehicles has been significantly reduced, however with a reduced noise footprint in the MO the engine and drivetrain noise is more noticeable. I'm thinking I may look into what is involved with pulling the carpeting back and installing more material in the interior firewall and front flooring (if anyone knows what is involved or a youtube vid let me know). The doors have a very solid , heavy feel - all the tinny sounds they made are gone including the tinny sound the handle made opening and when it released back. Can't say it made (or didn't make a difference in sound quality of the speakers as I swapped the stock speakers for the Focals while I had the skins off.

Image
 
#18 ·
Hi all,

Since I replaced my stock speakers... https://
Finally got around to...
assad and upinsmoke, did either of you (or anyone else that's done similar) have any issues or problems getting the inner door panel back on after putting on the deadener? i'm going to be doing something similar and it would be very helpful to know in advance how much room there is between the backside of the door trim panel and the innermost metal of the door. it seems both of you used .080" material, did you have any problems getting the inner panels back on or could you have gotten more sandwiched in there? if so, how much more room would you estimate is in there? thanks to any and all that shed some light on this so that I only have to take the panels off once and can have all my materials ready before starting. thanks again.
 
#19 ·
Hi @surban1


You should have plenty of room, there is ample space between the door trim and the door. I would not worry about that...
 
#20 ·
Hi @surban1


You should have plenty of room, there is ample space between the door trim and the door. I would not worry about that...

thanks for quick response and information. i'm trying to decide on whether to go with 1/16" mlv or 1/8" mlv, sandwiched between two layers of either 1/16" or 1/8" sponge foam. the 1/16" mlv weighs in at 0.5#/ft2 while the 1/8" mlv is 1#/ft2; the foam weighs ~ one-two ounces/ft2 for the 1/16" and 1/8" stuff respectively. the foams compress down ~ 50% under moderate force but the mlv doesn't compress and needs to be as "un-restrained" (aka, loosey-goosey) as possible. since you were able to get in the .080" cld, I figured that I could probably work in 1/16" foam around 1/16" mlv but if I could fit in the 1/8" mlv, it'll yield better results. if I go all 1/16" stuff, the total thickness would be ~ .125" (about 50% more than you got in), going with all 1/8" stuff would be ~ .250" (more than 3-times what you got in), and 1/8" mlv with 1/16" foam would be ~ .187" (just more than double what you got in). nothing is available locally so it has a time lag and i'm getting a little ocd about it. the safest play would be go all 1/16" stuff but I want to get the maximum results possible since I only want to play with this once. thanks for the good info:)
 
#21 ·
Thanks for this great post Assad. I'm going to be doing this myself sometime in May. I was just wondering if you're able to help me out with answering a few small questions please?

Did you find it difficult to put back the door handle and lock cables? Or is if straight forward to remove and put back?

As well, do you know if there are seperate connections to the ambient lighting on the door or is it incorporated into the window switch? I just dont want to damage it when pulling off the panel.

As well, do I have to be careful when inserting the mat on the inside metal? I'm worried that it might interfere with the window operation. Anything I should know?

Finally, did you have any issues reinstalling the panel using 80ml sound deadened? I noticed on your driver side door you covered the clip holes and just poked a hole onto it but on the passenger side you cut out around it?

Sorry for all the questions. You just seem to have done an awesome job from the pictures.

If anyone else has experience, please let me know.

Thanks in advance.
 
#22 ·
Hi @vortex,


Putting back the cables and door handles is straight forward, I do not think you will have any issues there


No, it will interfere with the window opening at all


You should cut the mat around the door clip instead of just putting a hole, it make it easier to put the door panel back.


Also, make sure you have some extra clips, just incase you break or loose one:


-------------------------

Concerning the ambient light on the door panel, it wasn't easy at all, that's why I did not document it here or took any pictures.


The main issue:
I could not find +12V inside the door panel where you can tap to power the LED. The lights on the windows UP/DOWN switches are +5V, that's why I could not tap into them. So I had to route +12V, and +ILLUM signals from inside the car by going through the rubber boot connecting the door to the car chassis. There is a big connector on that rubber boot, so you have to be very careful not to break any existing wires when fishing the wires to power the LEDs from the inside of the car. Not an easy task, and takes lots of time to fish those wires (+12V and ILLUM) through.

The +ILLUM signal powers all the LED, because they only come on when the headlights come on.
 
  • Like
Reactions: PaulDay
#23 ·
Thanks for your help Assad. I really appreciate it.

I ended up getting 72sq feet of the sound deadener.

2 packs of 36sqft. 80ml thickness.

I am planning on doing all 4 doors. Both the inside sheet metal and the stamped metal behind the door panel.

I also plan to do some of the hatch. I don't want to go too crazy on that due to not wanting to weigh it down too much for the motors.

I also plan to throw some under the spare tire area where the subwoofer is.

If I have any left over then I might end up putting some under the hood behind that foam padding that's attached to it. Just to prevent the engine vibration going through the hood. Anything left over after that is getting stuck onto my in home furnace ducts.
 
#25 ·
No, but it does make it difficult getting it back on. I had to use a plastic tool to guide the rubber back in place correctly without distorting in that area.


Have a good day.